Guides / Machining
Joining Machined PEEK Parts: Adhesive, Laser or Ultrasonic
October 9, 2026
Sources: manufacturer datasheets and published standards. See editorial standards.
PEEK resists nearly everything, and that includes glue. The same chemical inertness that makes it suitable for pump parts and surgical instruments leaves its surface with little for an adhesive to hold. A joint that holds after a week on the bench can let go after one sterilisation cycle or one hot oil soak. The decision about how to join machined PEEK parts should be made on the drawing, not after the first batch of failed assemblies.
Why PEEK is hard to bond
PEEK is semicrystalline, chemically resistant and has a low surface energy. Most adhesives wet it poorly, and a surface coated with machining coolant or fingerprints makes this worse. Three steps fix most failures.
Clean first. Remove coolant, oil and handling residue with a solvent wipe or detergent wash. Isopropyl alcohol is common, and compatibility is rarely an issue for PEEK itself.
Roughen. Light abrasion with fine abrasive paper or grit blasting gives the adhesive mechanical grip and fresh surface.
Activate. Plasma, corona or flame treatment raises surface energy for a short time, often hours, so bonding follows soon after. Chemical etching exists but needs controlled handling. Adhesive makers publish preparation guides for PEEK, and those should be followed rather than improvised.
Adhesive bonding
Two part epoxy is the usual choice for structural bonds in PEEK. It offers good strength, chemical resistance and a range of cure schedules. Some polyurethane and acrylic structural adhesives also work. Cyanoacrylate gives quick fixturing but weak long-term performance in heat or moisture, so it is best for assembly aids rather than service loads.
Design matters as much as the adhesive:
- Give the joint area, not a butt joint. Lap and scarf joints spread load, while a butt joint concentrates it.
- Keep the bond line thin and even, typically 0.1 to 0.3 mm.
- Match the thermal expansion. PEEK expands several times more than steel or ceramic, so a bonded metal part can crack the adhesive line on heating.
- Check the adhesive’s temperature rating. Most epoxies lose strength well below PEEK’s own service temperature.
Welding methods
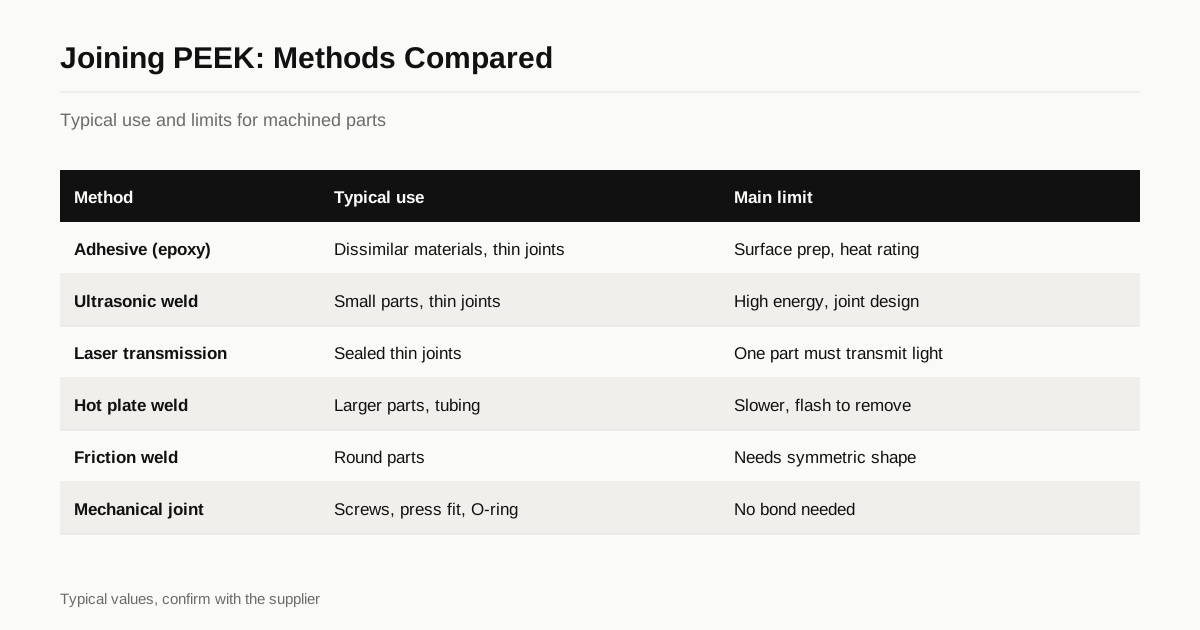
| Method | Typical use | Strength | Limits |
|---|---|---|---|
| Ultrasonic | Small parts, thin joints | Good if joint is designed for it | High energy, energy director needed |
| Laser transmission | Thin sealed joints | Clean, no particles | Needs laser-transparent part and absorbing part |
| Hot plate | Larger parts, tubing | Strong | Slower, flash to remove |
| Friction or spin | Round parts | Strong | Needs round or symmetrical shape |
| Adhesive | Dissimilar materials | Moderate to strong | Prep and temperature limits |
Ultrasonic welding melts the plastic at the joint with vibration. PEEK needs more energy than most thermoplastics because of its high melting point, so joint design usually includes an energy director and the process is run at a higher amplitude. Filled grades are harder to weld than unfilled.
Laser welding passes light through one part and heats the interface at the second, which absorbs it. Natural, unfilled PEEK in thin sections transmits near-infrared light, while black or filled PEEK absorbs it, so the pairing of one natural and one black part is common. The result is a clean seal without particles, which suits medical and fluid parts.
Hot plate and friction welding use heat from a plate or from rubbing to melt the joint. They suit larger parts or round parts and leave flash that may need removal.
None of these methods is a casual shop-floor process. Each needs trial runs on real parts, a joint design that suits the method and a test that checks the result, such as a burst or pull test.
Mechanical joining as an alternative
If the joint does not need to be sealed, a mechanical fastener often beats a bond. Screws into threaded inserts, press fits and snap fits avoid the surface preparation problem. For sealed fluid paths, O-rings against machined faces avoid adhesive altogether. Often the most reliable joint is the one that was designed out.
Service conditions decide
A bond is only as good as its worst environment. Before choosing a method, list what the joint will see:
- Temperature range and number of thermal cycles.
- Chemicals, from cleaning fluids to process media. The chemical resistance guide lists common cases.
- Sterilisation method and cycles. See the sterilisation guide.
- Load type, whether shear, peel or tension.
- Whether the joint is sealing or only holding.
Peel loads are the weakest case for an adhesive joint, so avoid designs that load the bond in peel.
Testing a joint before it matters
A joint that has not been tested is an assumption. PEEK joints fail in ways that are hard to predict from the datasheet of the adhesive or the welder, so the sensible step is to build a few test coupons or sample assemblies and break them.
Useful tests include:
- Lap shear. Pull two bonded strips apart in line and record the load at failure. Compare dry results with results after the heat, fluid or sterilisation exposure the part will see.
- Peel. Peel one strip away from the other. Peel strength is usually far below shear strength and shows how a joint behaves at an edge.
- Burst or leak test. For a sealed assembly, pressurise it and hold. Test at temperature as well as at room temperature.
- Thermal cycling. Cycle between the extremes of service and test again, because mismatched expansion shows up as cracks in the bond line.
Look at how the joint failed, not only the load. A failure inside the adhesive means the surface prep worked and the adhesive is the limit. A failure at the interface between adhesive and PEEK means the prep did not work. A weld that fails away from the joint means the weld is stronger than the parent material, which is the result to aim for.
Record the surface preparation, the cure schedule and the lot of adhesive used for the coupons, and keep them with the part specification. A change in any of the three can change the result.
What to put on the RFQ
State the joint type, the materials on each side, the service temperature, the media and the test you will use to accept the joint. If you want the shop to join the parts, name the method or ask for options. If you only want machined parts that you will bond yourself, say so and give the surface finish requirement, because a very smooth surface bonds differently from a rough one. Send the drawing and we match you with up to three shops, with a reply within 24 business hours.
Frequently asked questions
Can PEEK be glued with ordinary super glue?
It can stick for light handling, but the joint is weak and does not survive heat, moisture or chemicals. PEEK has a low surface energy and resists solvents, so a lasting bond needs surface preparation and an adhesive chosen for the service conditions, usually a two part epoxy.
Is PEEK weldable?
Yes. PEEK is a thermoplastic and can be joined by ultrasonic, laser, hot plate or friction welding. Its high melting point near 343 °C means more energy than most plastics need, and the joint design and grade, especially filler and colour, decide whether the weld is strong.
Do bonded PEEK joints survive steam sterilisation?
Some do, but not all. The adhesive has to be rated for the sterilisation method and the number of cycles, and the joint should be tested on real parts. The PEEK itself tolerates steam far better than most adhesives.
Need a quote for this part?
Send the drawing. We match you with up to 3 shops that cut your PEEK grade and reply within 24 business hours.
Get matched with a PEEK shop