Guides / Sourcing
What a Shop Needs to Machine Spinal Cage Prototypes in PEEK
October 20, 2026
Sources: manufacturer datasheets and published standards. See editorial standards.
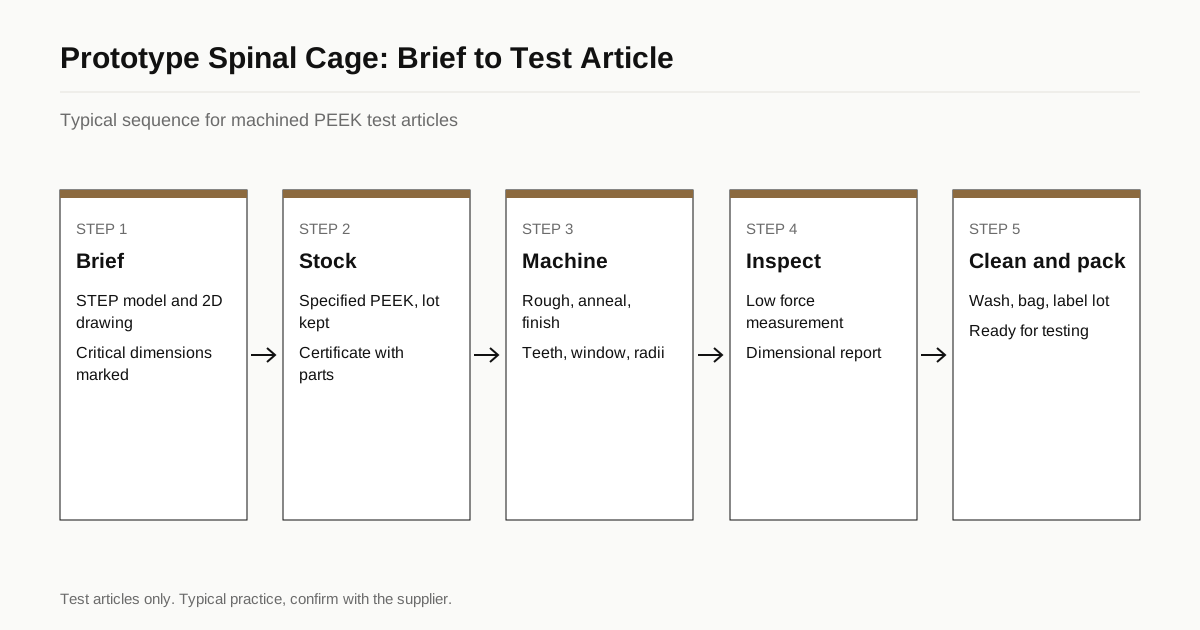
A spinal fusion cage looks like a small block with a hollow centre, rows of teeth on its faces and a few radii that make it fit between two vertebrae. Making a handful for mechanical testing or a surgeon’s review is a good job for CNC machining in PEEK. It is also a job where a vague brief leads to a batch that cannot be tested. This note covers what a shop needs to machine prototype cages, and what it does not make: it describes test articles, not implants.
Why PEEK and why machined
PEEK is used in fusion devices because it has a modulus closer to bone than metal, it is radiolucent so bone growth can be seen on imaging and it is a long established implant material. Prototype volumes are small, designs change and machining needs no tooling. A design change costs a program edit and a few hours, where a mould change costs weeks. Machining is therefore the standard route for prototypes, design verification samples and early build stages.
Mechanical testing follows standard methods. ASTM F2077 describes static and dynamic tests for intervertebral body fusion devices, and ASTM F2267 covers subsidence. The test articles have to be representative, which drives what the shop must do.
What the brief should contain
| Item | Why it matters |
|---|---|
| 3D model, STEP format | Carries the cage geometry and teeth |
| 2D drawing with tolerances | States critical dimensions, finish and datum |
| Material and lot requirement | Test results depend on the stock |
| Quantity and revisions | Batch size sets setup and fixture choice |
| Test purpose | Mechanical test, fit check or visual model |
| Cleaning and packing | Handling expectations for test articles |
The model alone is not enough. Cages have organic surfaces and many features, and only a drawing says which are critical. Mark the datum, the overall height, the lordotic angle if present, the graft window and the tooth form.
Material and traceability
For mechanical tests that predict implant behaviour, the prototype should come from the same material as the production design. That means implant grade PEEK stock, sold with the supplier’s documented testing, such as stock supplied to ASTM F2026 and with a lot certificate kept alongside the parts. The implant grade guide explains the distinction between implant grade and standard stock.
A prototype is not an implant, and a shop machining it does not make it one. The shop’s role is to cut the part to the drawing from specified stock and to keep records. Approvals belong to the device manufacturer. Radiopaque variants, covered in the X-ray opaque PEEK guide, have their own material documentation.
If the final product will be moulded, say so. Machined and moulded PEEK differ in microstructure, and a test on machined articles may not predict a moulded part exactly. The machining versus moulding guide covers where the difference shows.
Geometry and machining challenges
Teeth. Serrations on the cage faces grip the endplates. They are small, sharp and often angled, so machining them takes fine tools and careful toolpaths. Tooth tips chip if the tool is dull, and the tooth form affects both fixation and testing.
Thin walls and windows. Hollow cages have thin walls around the graft window. Clamping can deform them, so fixtures support the part inside and out, or use soft jaws and wax or low-melt fixtures for finishing.
Five axis access. Faces angled for lordosis, bullet noses and side windows need access from several directions. Five axis machining, or multiple setups with a careful datum, handles it. Fewer setups give better alignment of features.
Surface finish. Machined PEEK surfaces are matte and slightly textured. A smooth bullet nose helps insertion, and a teeth face is left as cut. State finish by area, not as a blanket requirement.
Stress and movement. Small cages have little mass, but residual stress can still move thin walls. Annealing between roughing and finishing keeps dimensions stable, as described in annealing PEEK parts.
Tolerances and inspection
Typical critical dimensions on a prototype cage are height, footprint, window size and tooth pitch. Tolerances in the range of ±0.05 mm are common, with tighter values on the height. Measuring teeth and organic surfaces needs optical or CMM methods with low force, not calipers. Inspecting PEEK parts covers temperature and fixturing during measurement.
Ask what the shop reports. A dimensional report with the critical features and a lot certificate for the stock is usual for test articles. Medical device customers often ask for more, and the shop’s quality system, not the matching service, carries that. The FDA documentation guide lists typical paperwork.
Cleaning and handling
Test articles are not usually sterile, but they should be clean and free of coolant, chips and handling marks. Specify cleaning and packing, for instance a detergent wash, a deionised rinse and individual bags. Mark each part or each bag with the revision and lot so test records trace back to the stock.
Fixturing and workholding for a small hollow part
A cage is small, hollow and has no flat surface that is also a datum on every side, so holding it is half the job. Common approaches include soft jaws shaped to the cage profile, a vacuum fixture that holds the footprint without squeezing, a sacrificial tab that is cut away at the end and a low-melt fixturing material that supports thin walls during finishing.
Each method trades rigidity against distortion. A tab keeps the part rigid through the whole cut but leaves a witness mark where it is removed, so it needs to sit on a surface that does not matter. A vacuum fixture avoids marks, but cutting forces must stay low. Ask the shop which method it plans, and whether the first article shows any mark from the workholding.
Iteration and revision control
Prototype programmes run through many versions of the same cage. Each revision should carry a label on the drawing, the model file and the parts, so that a test report ties to the exact geometry. Mixed revisions in one test group make results hard to read. Agree a naming scheme at the start, and ask the shop to confirm the revision in writing on each delivery. If the design will move to a moulded or additive route later, say which features are likely to change, so the machined versions are not over-optimised for a route that will not continue.
What to put on the RFQ
State the material and lot requirement, the quantity and revisions, the critical dimensions and tolerance, the tooth form, the test method the parts will see, the finish by area, the cleaning level and the documents required. Say if later volumes are expected. Send the drawing and we match you with up to three shops with medical machining experience, with a reply within 24 business hours.
Frequently asked questions
Can prototype spinal cages be machined from the same PEEK as production implants?
Yes, and for mechanical testing they often should be. Machining from implant grade stock, with the same lot documentation the production route will use, makes test results comparable. The prototype is a test article, not an implant, and it carries no approval.
What file format does a shop need for a spinal cage?
A 3D model in STEP format for the geometry plus a 2D drawing for tolerances, surface finish and notes. The model alone does not say which features are critical, and the drawing alone does not carry the organic surfaces of a cage.
Why do prototype cages use machining instead of moulding?
Machining needs no tool, so a design can change between batches at the cost of a program edit. Moulding needs a mould that costs far more and takes weeks. Prototype and early test volumes are almost always machined, then moulded or machined for production depending on volume.
Need a quote for this part?
Send the drawing. We match you with up to 3 shops that cut your PEEK grade and reply within 24 business hours.
Get matched with a PEEK shop